Demo Kit: Distribution Engine

Assignment Made Easy

Distribution Engine, developed by NC Squared, is a market leading, fully native application for routing and assigning work in Salesforce®. Automate and monitor your assignment workflow and streamline your team performance with Distribution Engine.

Find us on the AppExchange | Contact us with any questions.

Why use Distribution Engine

Distribution Engine is a great fit for a number of use cases across Sales & Service Cloud teams, including:

Sales or Revenue Operations Teams

Distribute Sales Leads to the right rep at the right time, helping them hit individual & team targets by reducing time to contact & missed SLAs. Eliminate manual and hidden custom assignment processes to automate complex distribution rules.

Also applicable to routing Opportunities, Contacts or Accounts to reps.

Customer Service or Success Teams

Assign Cases to the best Agent available for that case, balancing agent workload and helping to improve response times and first-time resolution. Eliminate manual case assignment or agent cherry picking by automating assignment rules.

Also applicable to distribution of Accounts or Tasks to Customer Service, Success or Project teams.

Lead Workflow Optimization

De-duplicate or auto-convert new leads based on your own criteria to streamline & automate your lead workflow. Match to existing Leads, Accounts or Contacts and dynamically convert into Accounts, Contacts and Opportunities using rule-based logic.

Available as an enabler for more efficient routing or even as a standalone use case.

Demo Video

This video will guide you through the main features of Distribution Engine in a Sales Leads use case. It is based on the setup achieved by following the Demo Setup Guide below.

Demo Walkthrough

Click on each section header to see the full transcript of the demo; click on the time to jump to that section of the video in a new window:

Introduction0:00

Distribution Engine is a powerful native Salesforce application that simplifies the process of routing objects to the right team member at the right time.

We help Sales teams to distribute Leads, Contacts or Opportunities to the right reps at the right time, helping them improve speed to lead and hit targets. We also enable Customer Service teams to assign Cases or Accounts to the best agent, helping to improve response times and case resolution.

Whether it's a standard or custom Salesforce object, Distribution Engine makes it easy to create intelligent routing rules that streamline your workflow saving you time and increasing productivity. If the object has an owner, we can assign it.

For the purpose of this demo, I’m going to focus on lead routing but the setup and flow remains largely the same for any other Salesforce object. I’m going to show you the core functionality available within the app so let’s start off with the Distribution Teams page.

Teams: Setup overview including Process View1:00

The application is designed around teams, and you can create teams that reflect the actual teams within your organization. So within the distribution teams page, here you have two views, a list view, which you're currently viewing, and a process view.

So the process view allows you to see all of your distribution logic in one place and provides a bird's eye view of your setup. It's also a good place to start any troubleshooting if that's needed. Here on the left hand side, you have your sources, and these could be Salesforce queues or users. And on the right hand side, you can see how these linked to your teams and distributors, allowing easy navigation around your setup.

The list view here shows you the teams that you've set up within your org. So each team can be created to distribute one type of self source object, such as the lead a case, an account or opportunity. Here, you can add new teams, you've got options to clone teams, activate and deactivate teams. And you can also reorder those teams. So they run in the order that you'd like.

So let me head into my US SDR team here and show you what that looks like.

This side menu allows you to easily navigate through various options, including the setup of your distribution rules via the distributors tab here, waiting in caps and distribution hours, amongst other things.

The home tab at the top provides a team summary where you have these dashboard panels showing your activity over the last seven days. You can also view your team members and check their availability and see an overview of the distributors that you've got set up within the team.

Below that we have team members. So here you can see who is part of the team. So these are the Salesforce users that are added to the team, we can check their status, so whether they're available or outside of working hours. And as a DE admin or Team Manager, you can toggle them on or off from here, if needed.

Teams: Live Availability3:15

Within the Availability tab, you can see a month by month overview of the availability of your team. So who's working when and if there are any gaps in your schedule. The calendar will also show you how many team members are working each day. How many team members are out of office and how many of them are on holiday, as well as giving you an insight into any that are working particularly shift patterns.

Distribution logic: Distributors3:45

Then we come on to the distributors.

So these are essentially the rules that determine how leads are going to be assigned to the team. So just a couple of things to mention about the distributors. As you can see, you can have multiple distributors within a team. And they run from top to bottom. So here it's going to kick off with my account manager sheabutter four followed by my hot, warm and cold leads. And then I have a catch all at the bottom. So let me head into my hot leads distributor here and show you what that looks like.

We have the name of the distributor at the top.

Method is where we can select the assignment method that we want to use to assign the leads. So if you're just interested in fairness, you can use round robin or load balancing where you can equalize workload amongst your team members. We also have a couple more advanced options, as well as sticky assignment, which caters for support use cases.

Below that we have source. So typically leads will be sitting in a Salesforce queue. And in this case, they're being assigned from the US SDR lead queue. You can also assign from a designated Salesforce user, or assign based on a certain status value in a picklist. So it lets you assign leads when they change to a particular status. So for example, qualified and you can then pick a different value once they've been assigned.

Then we come on to the field based filter. So this is where we can start setting up the criteria for which leads we want to pick out in this case from the Salesforce key for this particular distributor, and you can start building that criteria up. So we've kept it quite simple for this one. So we're just interested in hot leads. So we're looking at a field called rating on the lead. If rating equals hot, only those hot leads will be distributed from that queue, you can add additional rows, or filtering criteria depending on how complex or simple your setup needs to be.

Team member matching: Tags6:00

Then at the bottom, we have the team member filter. So this is where I can choose who I want to assign my leads to. So if I want all of my team members to get the leads, I can leave it at the default, which is all team. But if I want to be selective, then I've got a couple of options, I can utilize this middle option, whereby I can create a manual sub team. So here and again, Bruce, are the two reps who will be receiving these hot leads, they will round robin amongst the two of them, and ignore everybody else.

The other option is tags. So the idea behind tagging is that you can create some attributes for your reps and the type of leads that they'll work. And DE will use that information to intelligently assign out the leads. So you can set up tight collections and tags via the distribution tags tab here at the top. And these could really be anything you like. So industry company size, language being a few examples of tag collections. And then within those, you would create the appropriate tags. So within the distributor here as an example, I've selected industry as the tag collection from the first drop down.

The second drop down is the Industry field on the lead. So if for example, the first leads comm comes in with industry equals agriculture, it will only consider the reps that have the agriculture tag assigned to them. So with this dynamic option, it's dynamically matching the information in the field on the lead with the tags that you've dropped on to your users. So trying to match that lead with the most appropriate rep based on the attributes or the tags that they hold.

Controlling distribution: Weighting & Caps7:50

Next, we've got weighting and caps. So for Round Robin, and even load balanced assignments, you have the option to weight that assignment. So here we could say Bruce is one of our senior reps. So let's give him two leads for everyone that everyone else is getting. Peter who's recently joined the team, we don't want to overload him with work. So let's dial him down to for example 0.5. So he will miss every other round in the round robin assignment.

Then we have a couple of tabs for caps. So caps can be set at the team level, and also at the distributor level. So here, we can use these to control the flow of leads. So at team level, we allow up to three team level caps at once. So for example, daily, weekly, and monthly within the distributor level setting.

If I take a look at my hot leads distributor. Here, I could limit my reps to let's say 20 hot leads per day, once they receive 20 for this particular rule, they wouldn't receive any more until we're into the next day. So here we can use distributor level to override what's happening at team level, if needed.

Availability planning: Distribution Hours & Shifts9:20

Just briefly, distribution hours is where you can control when that assignment happens. So here on Mondays, for example, as soon as a lead comes in and gets assigned straightaway, or more typically Tuesday through Friday is within the working hours of the team. So 8:00am in the morning, through to 5:30pm in the afternoon. So one of the benefits of using set hours is if you wanted to track speed to lead or time to contact, you’re then not counting the hours outside of their working hours.

So distribution hours can also be applied at team member level. So Bruce here who's currently working team hours, we can actually move him across to a particular shift pattern if we so wished.

Monitoring: Action Tracking, SLAs & Auto-reassign10:10

Having mentioned time to contact previously, there's a couple of areas of tracking that I just like to finish off with. So tracking comes in two parts. So we have action tracking here at the top and we have SLAs at the bottom.

So in terms of action tracking, this enables you to track from the time of assignment to the point when in my case here, the lead status changes to ‘Contacted’. So that lead status may be changed manually by the rep. Or we could listen out for Salesforce events. So here I'm listening out for email or call type events. So if an event is created against the lead, then DE will automatically update the record to ‘Contacted’ and calculate how long that took.

On the other side of tracking, we have SLAs. And these are basically alerts that help to track key targets in terms of time to contact.

So I have a couple setup within this team. The first one is essentially saying if after 20 minutes from the time of assignment, the status is still equal to new, this means the rep hasn't followed up in time. And the default action here would be to send out an email notification stating that they've just missed the SLA and they need to take some action. Now if after 40 minutes, they still haven't picked up the lead, we can take this a step further by automatically getting that lead assigned to another rep. And we can do that via the distributor level tab here.

So here within my hot leads distributor, all I need to do is enable SLAs, enable auto reassign, decide which of the SLA is I want to reassign from. In this case, it's the 40 minute one. What this will do is it will reassign that lead back into the US SDR lead queue and then automatically reassign that to the next available rep in line.

Summary12:00

Okay, so that was a brief overview of the core functionality and distribution engine. I’d like to thank you for watching. If you'd like any more information on the topics that I've covered here, or how to set things up, please have a look around our knowledge base or get in touch if you have any further questions.

Demo Setup Guide

This is a guide on how to set up DE to demo a Hot Leads distribution as shown in the demo above. This will allow you to demo most DE features. Referring to the video will give an idea of what screens should look like once set up

1. Installation

Install Distribution Engine into your org from the AppExchange.

Note: Select Install for Admins Only.

For full install steps & prerequisites see our Installation Overview

2. Salesforce Setup

Sources

Decide and set up where your Leads are held before Distribution Engine picks them up. In most cases, it will be a Salesforce Queue. Go to Salesforce Setup -> Queues and create a new Queue for Leads.

More on SF queues here

Data Load

To test and simulate assignments, we recommend having a bulk of Leads available in the SF org. You can use CSV to upload Leads directly into the Queue that DE will then use as a source. You can use this CSV to import example Leads.

Note: You will need to add the ID of the Queue in the Owner column.

3. Distribution Engine Setup

Tags

With tags, you can assign attributes to your users that can be utilized in the Distribution Logic later. Tags offer easy-to-manage and scalable solutions. To create a Tag Collection, go to the Distribution Tags tab and name it something like "Rep Level". In the "Tags" field, add tags such as "Ramping", "Ramped", and "Super Ramped".

To create another Tag Collection called "Industry", start by creating the collection itself but do not add any tags yet. Instead, access the empty collection and choose the "Add Tags from Field" option. Select the "Lead" object and the "Industry" picklist. This will create a tag for each value in the picklist.

More on Tags

Distributors

Distributors are the rules which define how assignments are made. You can have multiple distributors per team, each with a different function. E.g. Hot, warm and cold leads.

From within the Team, navigate to the Distributors section (navigation list on the left) and Add Distributor. Name the Distributor and select the Source where your demo Leads are kept. Queues are the most common source.

Select your Distribution method - Round Robin is the most common method to demo. More on the different methods here.

Activate the Field-based filter toggle and filters. For the Hot Leads example, select what fields identify your hot Leads. For example - Rating equals Hot.

For the Team member filter, select By Tags -> Dynamic -> Industry Includes Industry.

You should also create a distributor for Warm and Cold Leads. These are to populate the setup, you don’t need to set it up to the same level as the Hot Leads distributor you are going to demo.

Top Tip: The more distributors you add to the Teams, the more populated the Process View is going to look. Try using a few different sources for your different distributors.

More on Distributors

Weighting

Select the Weighting and Caps menu item, enable weighting for the Team. This is where you can show the Weighting sliders.

More on Weighting

Caps

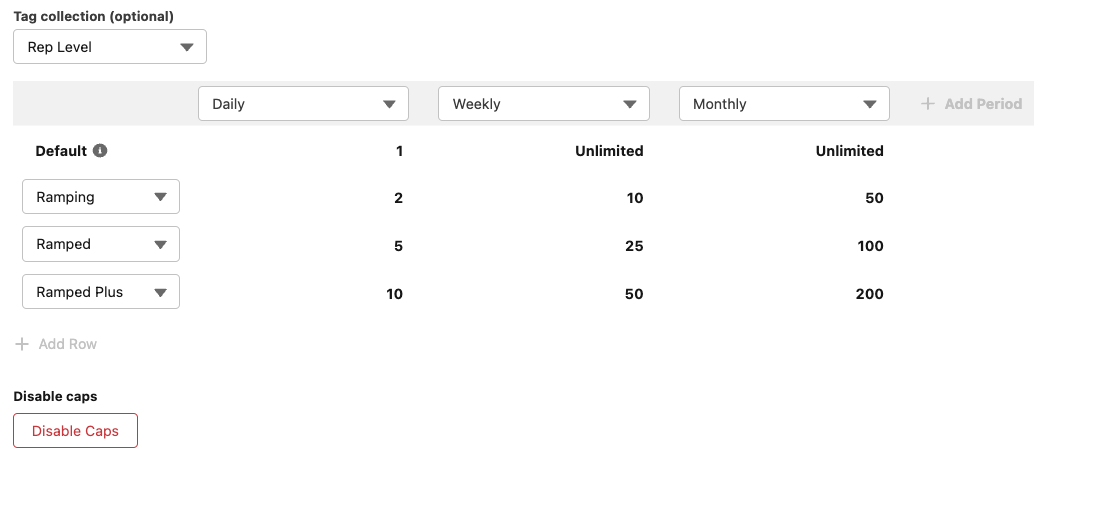
Next, set up a Team-Level Tag-Based cap. Use the Rep Experience Level Tag Collection from earlier. It should look similar to this:

Caps example with Rep Level tag collection selected and caps for 'Ramping', Ramped' and 'Ramped Plus'.

Next, add a Distributor-Level Daily cap to your Hot Leads Distributor. Switch to the Distributor-level settings to do this.

More on Caps

Distribution Hours

Set up example Team Hours. Add multiple segments for one day to show this capability. Set up a couple Shifts to showcase changing Team Member’s hours to a Shift, instead of the Team Hours.

More on Distribution Hours:

Tracking and SLAs

From the Tracking and SLAs menu item, enable Action Tracking and set up an example. You can use the Status field and a value you’d like to track the time of.

Enable Action Tracking and set up an example.

Enable SLAs and set up a couple of examples and switch to the Distributor-Level tab to enable Auto-Reassign.

More on Tracking and SLAs:

Other useful links

Get Started

Want to kick the tyres? Install a 30 day trial free of charge.

Free trial

Got questions? Contact us for a one-to-one live demo/Q&A session.

Contact us